0. Redmine 장단점
장점
•
오픈소스로 무료 사용 가능
•
원하는 기능만 커스터마이징해서 사용 가능
◦
필요한 메뉴만 활성화, 플러그인 연계 (템플릿 구성 플러그인, 슬랙 연동 플러그인, Google OAuth 플러그인 등)
◦
한글 번역도 자유롭게 변경 - 어색한 문구 표현도 원하는 형태로 자유롭게 변경 가능
•
필요한 기능만 활성화하면 복잡하지 않게 사용할 수 있어 보임
단점
•
최초 구현에 어렵습니다. (레드마인 버전에 따른 설정 및 플러그인 연계에 삽질)
•
Redmine 운영 및 관리 공수
◦
최초 구성 외에 공수가 크다고 생각하지 않지만 검토 필요
•
유료 솔루션 대비 다양한 기능을 제공하지 않습니다.
1. Redmine 설치 - Ubuntu 22.04
sudo su -
Bash
복사
# 슈퍼 유저 전환
apt update
apt install -y apache2 ruby ruby-dev curl build-essential libapache2-mod-passenger libmysqlclient-dev imagemagick libmagickwand-dev
Bash
복사
# 종속성 도구 설치
gem install bundler
Bash
복사
# rubygems로 bundler 설치
systemctl is-enabled apache2
systemctl status apache2
Bash
복사
# apache2 활성화 및 상태
apt install -y mysql-server
systemctl is-enabled mysql
systemctl status mysql
Bash
복사
# mysql 설치와 활성화 및 상태
mysql -u root -p
Bash
복사
# mysql 접근 후 redmine 계정 설정 (redmine/P@ssw0rd)
CREATE DATABASE redmine CHARACTER SET utf8mb4;
CREATE USER 'redmine'@'localhost' IDENTIFIED BY 'P@ssw0rd';
GRANT ALL PRIVILEGES ON redmine.* TO 'redmine'@'localhost';
FLUSH PRIVILEGES;
SHOW GRANTS FOR redmine@localhost;
quit
Bash
복사
cd /opt/
wget https://www.redmine.org/releases/redmine-5.1.2.tar.gz
tar -xvzf redmine-5.1.2.tar.gz
sudo ln -s redmine-5.1.2 redmine
Bash
복사
# redmine 설치 (5.1.2으로 설치함)
cd /opt/redmine
cp config/database.yml.example config/database.yml
nano config/database.yml
Bash
복사
# redmine의 데이터베이스 설정
=========================================
INPUT:
username: redmine
password: "P@ssw0rd"
:END
Bash
복사
bundle config set --local without 'development test'
bundle install
Bash
복사
# 번들러 명령으로 redmine의 Ruby 종속성 설치
bundle exec rake generate_secret_token
RAILS_ENV=production bundle exec rake db:migrate
Bash
복사
# redmine 토큰 생성 및 데이터베이스 마이그레이션
RAILS_ENV=production bundle exec rake redmine:load_default_data
Bash
복사
# redmine 설치 기본 값 로드
=========================================
OUTPUT:
en
:END
Bash
복사
a2ensite redmine.conf
apachectl configtest
Bash
복사
# redmine.conf 확인 및 구성 적합도 확인
vi /opt/redmine/config/locales/ko.yml
Bash
복사
# 메뉴 문구 수정
chmod -R 777 files log tmp public/plugin_assets
Bash
복사
# 5.1.2 버전에서 files, log, tmp, public/plugin_assets에 대한 권한을 부여해야 함
systemctl restart apache2
Bash
복사
# apache2 재시작
•
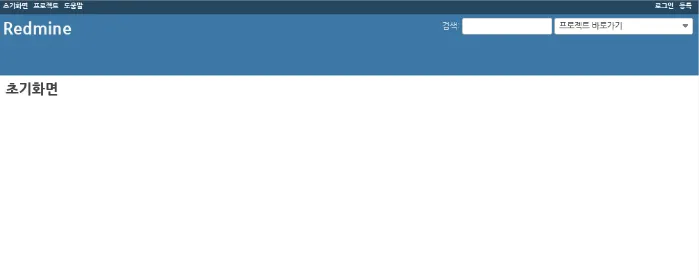
대상 주소로 접속하면 아래와 같이 출력됩니다.
◦
최초 계정 정보: admin/admin - 로그인하면 암호를 변경해야 합니다.
[Caption] Redmine 초기 접속 화면
⇒ 이 상태론 못쓰겠다… 테마와 플러그인을 적용하자!!!
2. Redmine 테마 및 플러그인 적용
cd /opt/redmine/public/themes/
git clone https://github.com/mrliptontea/PurpleMine2.git
Bash
복사
# puplemine2 테마 적용
systemctl restart apache2
Bash
복사
# apache2 재시작
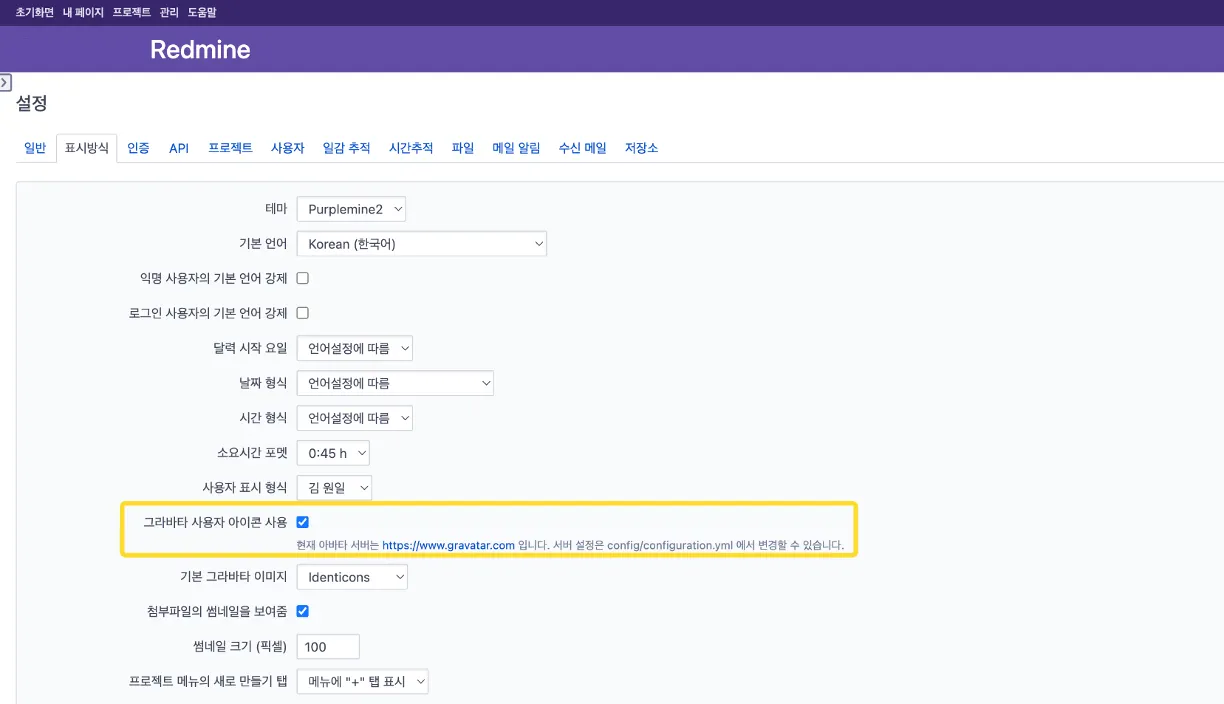
그라바타 사용자 아이콘 (Redmine 자체 기능)
•
관리 → 설정 → 표시방식 → 그라바타 사용자 아이콘 사용 → Check
•
기본 그라바타 이미지 : Identicons
•
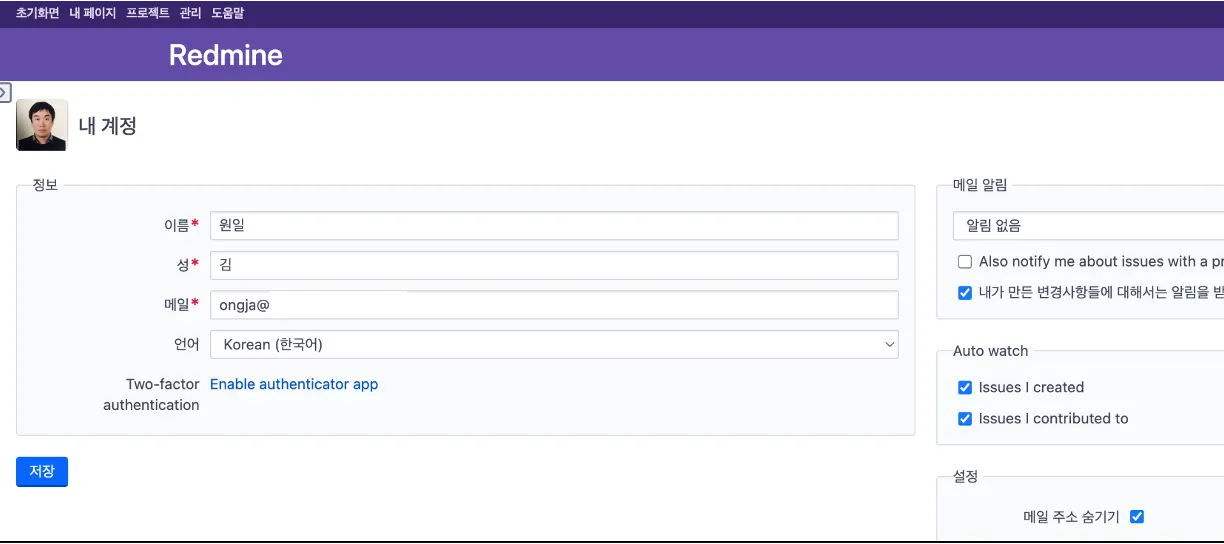
내 계정 → 좌측 상단 아이콘 클릭
◦
gravatar.com에서 가입하고 자신의 아이콘 생성
•
일감 생성 시 기본 템플릿 구성
cd /opt/redmine/plugins
git clone https://github.com/agileware-jp/redmine_issue_templates.git
cd /opt/redmine
bundle install
RAILS_ENV=production bundle exec rake redmine:plugins:migrate NAME=redmine_issue_templates
Bash
복사
# redmine_issue_templates 플러그인 적용
systemctl restart apache2
Bash
복사
# apache2 재시작
•
애자일 형태로 일감 관리 (free 버전에 대해 메일 주소 입력 후 다운로드)
cd /opt/redmine/plugins
unzip redmine_agile-1_6_8-light.zip
cd /opt/redmine
bundle install --without development test --no-deployment
bundle exec rake redmine:plugins NAME=redmine_agile RAILS_ENV=production
Bash
복사
# redmine_issue_templates 플러그인 적용
systemctl restart apache2
Bash
복사
# apache2 재시작
[참고] redmine 삭제
•
테마와 플러그인 적용 후 Redmine 접속!!
3. Redmine Slack Webhook 테스트
cd /opt/redmine/plugins/
git clone https://github.com/sciyoshi/redmine-slack.git
mv redmine-slack/ redmine_slack
cd ..
bundle install --without development test --no-deployment
bundle exec rake redmine:plugins NAME=redmine_slack RAILS_ENV=production
systemctl restart apache2
Bash
복사
# redmine-slack-plugin 설치
•
git clone하면 redmine-slack에 설치되는데 하이픈이 인식이 안되서 에러남 >> redmine_slack으로 변경
redmine 관리자 권한 계정에서 작업 (최초 생성한 admin 계정)
1.
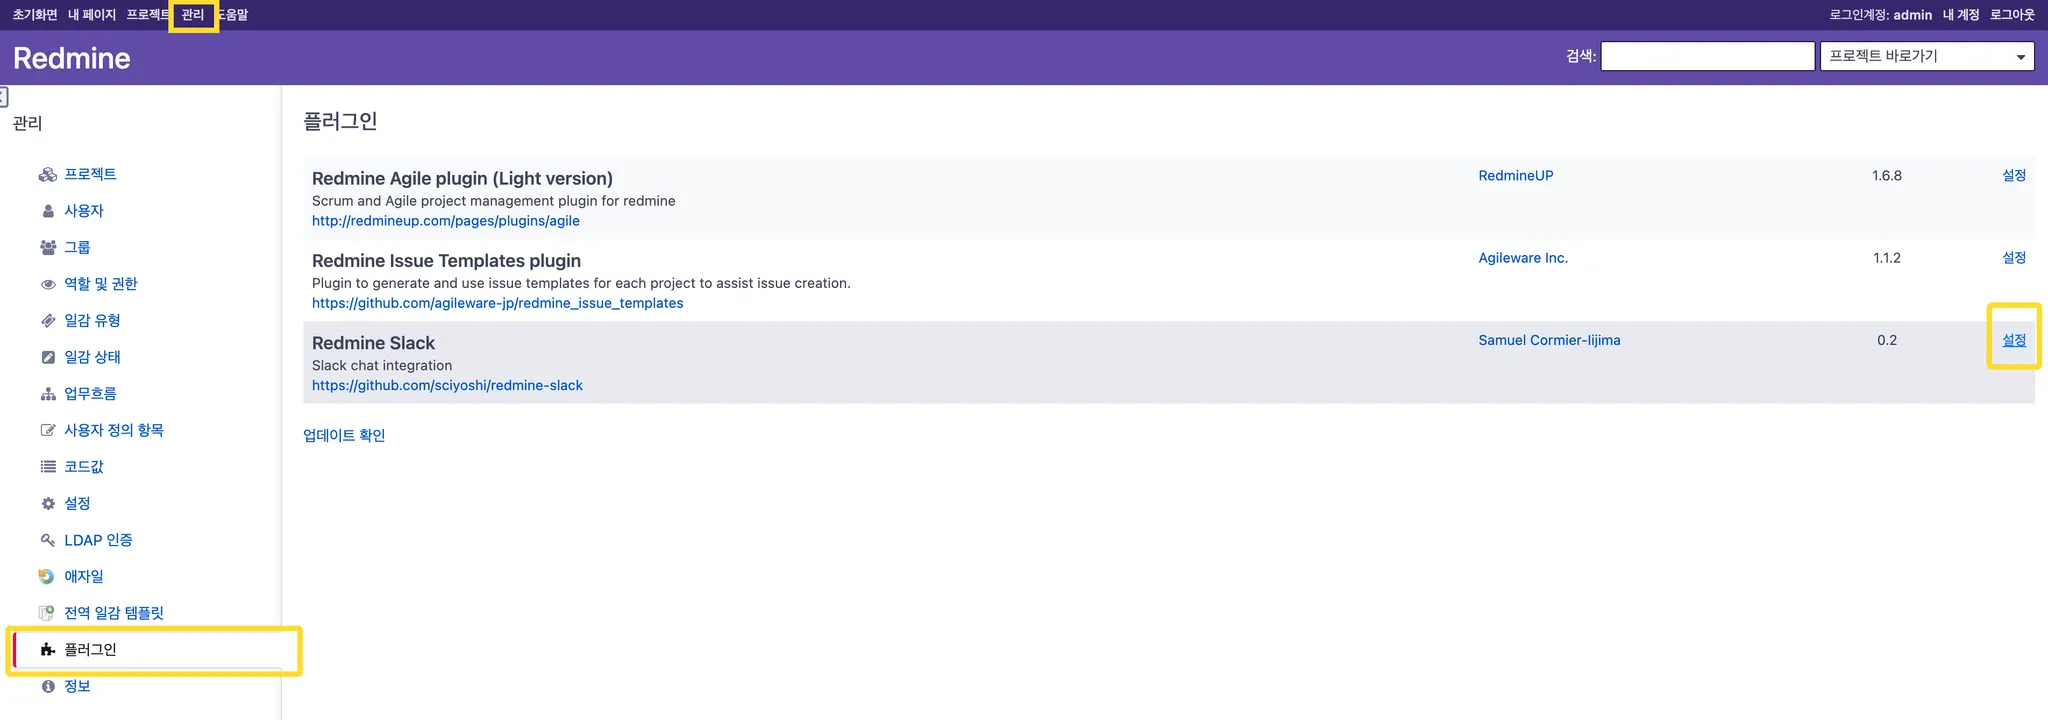
redmine plugin 설정 (관리 → 플러그인)
•
Slack URL : Slack Webhook 주소 지정
•
Slack Channel : 사용할 채널 지정
•
Post Issue Updates : Check ← 체크하지 않으면 일감 생성할 때만 알람 발생 (편집 및 종료는 알람 X)
2.
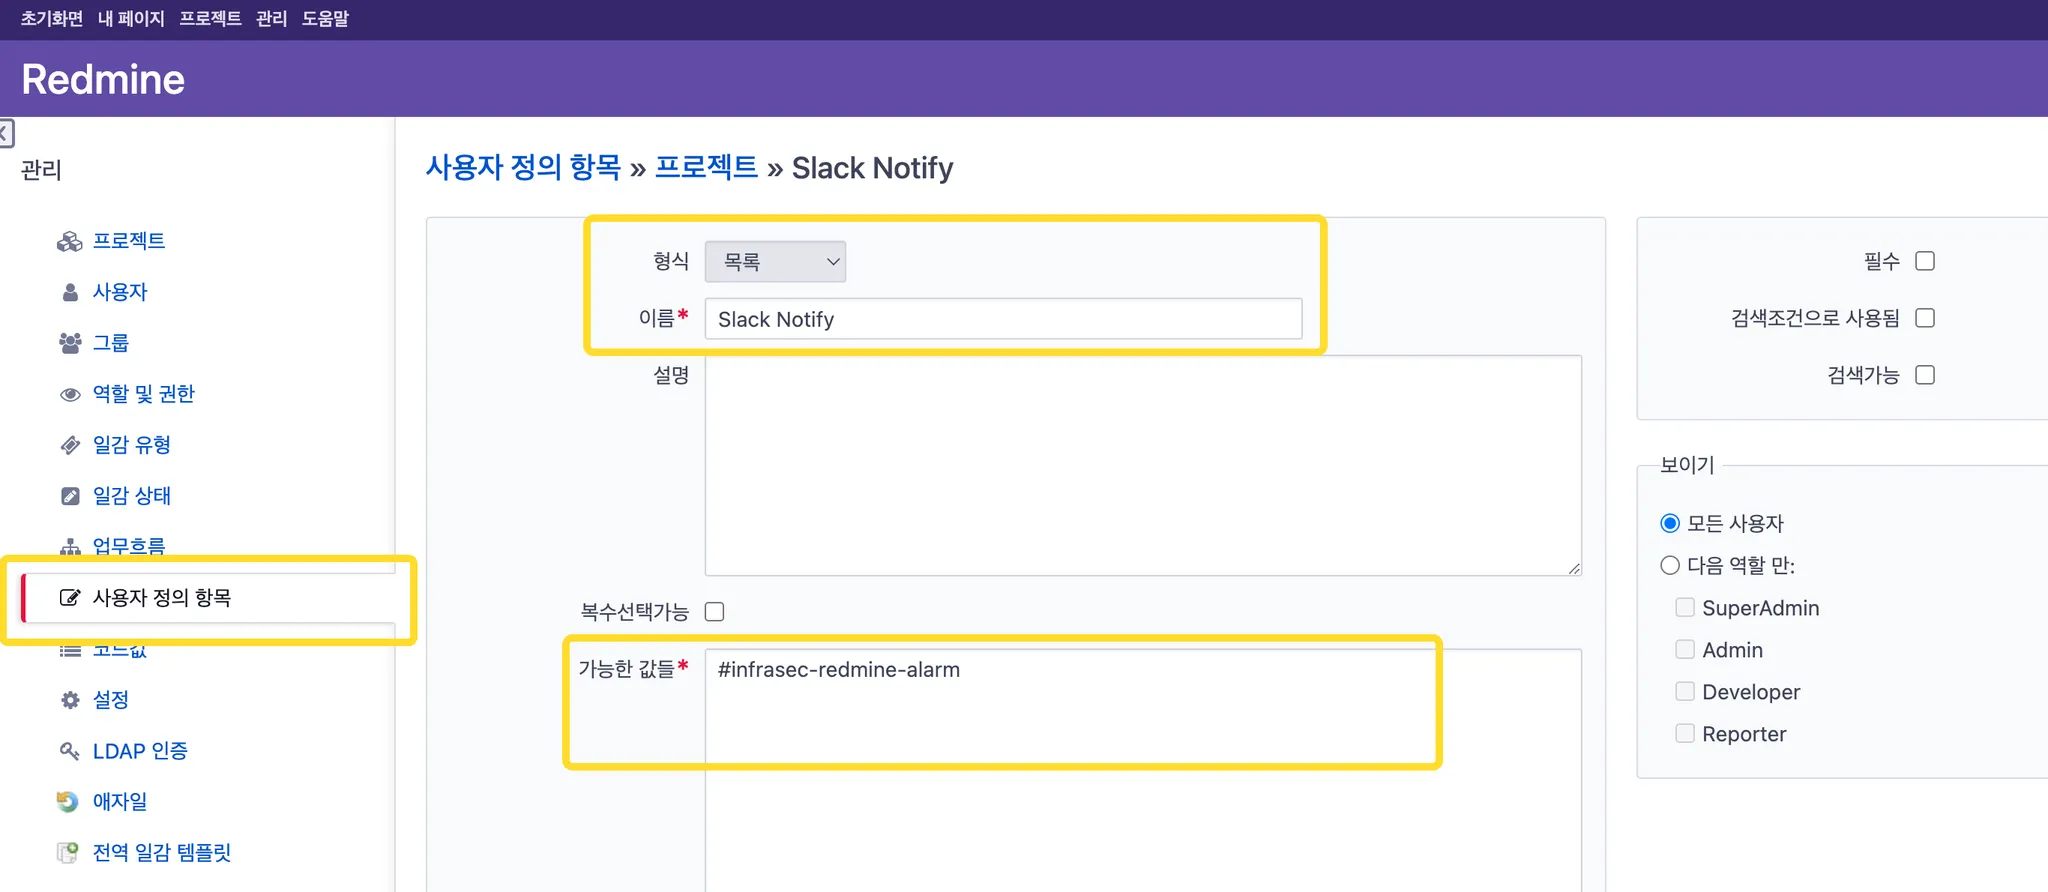
redmine 사용자 정의 항목 설정 (관리 → 사용자 정의 항목 → 새 사용자 정의 항목)
- 형식 : 목록 ← 선택
- 이름 : 아무거나…
- 가능한 값들 : #infrasec-redmine-alarm ← 채널 이름
3.
프로젝트 설정 변경 (프로젝트 → 설정)
- 프로젝트 탭에서 Slack Notify : #infrasec-redmine-alarm ← 선택
4.
결과 확인
•
모든 Action에 대한 정보를 슬랙 채널에 전달
[추가] 슬랙 메시지에 담당자 이름을 멘션으로 지정하기
4. Redmine OAuth 테스트 (google workspace)
•
플러그인 설치가 가능하지만 Google Workspace에서 설정할 때 ACS URL로 접근이 가능해야 합니다.
◦
즉, 퍼블릭 IP와 도메인이 노출되어야 가능
cd /opt/redmine/plugins/
git clone https://github.com/kontron/redmine_oauth.git
cd ..
bundle install
systemctl restart apache2
Bash
복사
# redmine 5.1.X 이상 지원
redmine https 설정
a2enmod ssl rewrite
Bash
복사
# apache2 SSL 모듈 활성화
apt update
apt upgrade -y
apt install certbot python3-certbot-apache -y
Bash
복사
# certbot 설치 (apache 경우)
sudo certbot --apache
Bash
복사
# Certbot 인증서 발급 및 설치
vi /etc/apache2/sites-available/redmine.conf
Bash
복사
# redmine.conf 수정
=========================================
INPUT:
<VirtualHost *:80>
ServerName redmine.xxx.io
ServerAdmin "IP or Domain"
# Redirect Request to SSL
Redirect permanent "/" "https://redmine.xxx.io/"
</VirtualHost>
<IfModule mod_ssl.c>
<VirtualHost *:443>
ServerName redmine.xxx.io
RailsEnv production
DocumentRoot /opt/redmine/public
ErrorLog ${APACHE_LOG_DIR}/redmine.xxx.io.error.log
CustomLog ${APACHE_LOG_DIR}/redmine.xxx.io.access.log combined
SSLEngine on
SSLCertificateFile /etc/letsencrypt/live/redmine.xxx.io/fullchain.pem
SSLCertificateKeyFile /etc/letsencrypt/live/redmine.xxx.io/privkey.pem
<Directory "/opt/redmine/public">
Allow from all
Require all granted
</Directory>
</VirtualHost>
</IfModule>
:END
Bash
복사
crontab -e
Bash
복사
# letsencrypt 인증서 자동 갱신
=========================================
INPUT:
0 3 * * * /usr/bin/certbot renew --renew-hook="systemctl restart apache2"
:END
Bash
복사
•
매일 새벽 3시마다 인증서 갱신 시도 → 성공하면 apache2 재시작
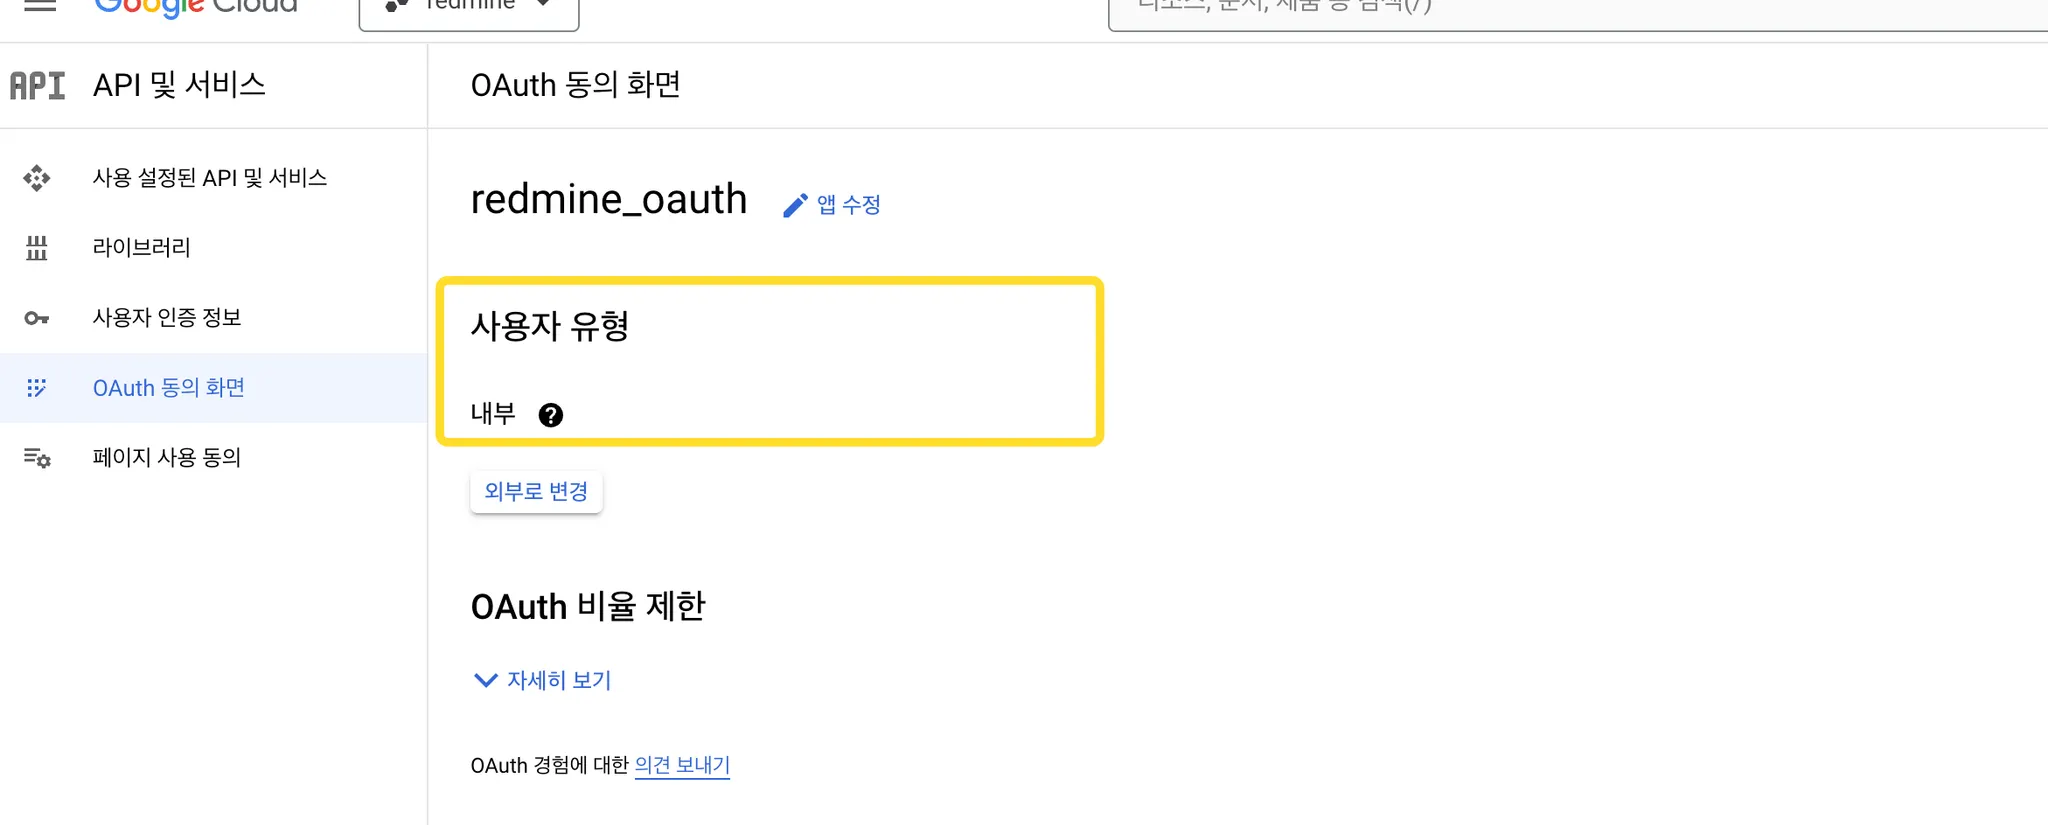
⇒ redmine OAuth 설정으로 사용자 유형을 내부로 지정해서 회사 조직 계정만 접근할 수 있습니다.
⇒ Continue with Google 버튼 클릭!!
⇒ 대상 Google 계정 선택하여 로그인!!
⇒ 로그인 완료!!


